Introduction
In the fast-paced world of e-commerce, the efficiency and reliability of your deployment process can make or break your business. For Shopify stores, where user experience and uptime are critical, having a streamlined deployment process is not just a luxury—it’s a necessity. This article delves into our comprehensive Shopify deployment process flow, designed to ensure that every update, feature, and fix is deployed smoothly and efficiently, minimizing downtime and maximizing customer satisfaction.
Table of Contents
Overview of the Shopify Deployment Process
A well-structured Shopify deployment process is the backbone of any successful e-commerce operation. It ensures that changes to the codebase are systematically tested, validated, and deployed without disrupting the live store. Our deployment process for Shopify is meticulously crafted to handle the complexities of modern web development while maintaining the agility required to respond to market demands.
The deployment process involves several key stages, starting from the initial code commit by the developer, through automated build and deployment triggers, to rigorous quality assurance (QA) testing, and finally, the release to production. Each stage is designed to catch potential issues early, ensuring that only the highest quality code makes it to the live site.
Objective
The primary objective of our Shopify deployment process is to ensure a smooth and efficient workflow from development to production. This involves:
- Minimizing Downtime: By automating key parts of the deployment process and conducting thorough testing, we aim to reduce the time the store is unavailable to customers.
- Ensuring Code Quality: Through continuous integration (CI) and automated testing, we ensure that only well-tested, high-quality code is deployed.
- Facilitating Collaboration: Our process supports a collaborative environment where developers, QA engineers, and other stakeholders can work together seamlessly.
- Enhancing Flexibility: The process is designed to be flexible, allowing for quick rollbacks and updates in response to any issues that may arise post-deployment.
- Maintaining Consistency: By following a standardized process, we ensure that every deployment is consistent, reducing the risk of errors and ensuring a reliable user experience.
In the following sections, we will walk you through each stage of our Shopify deployment process, providing detailed insights into how we achieve these objectives and maintain a robust, efficient, and reliable deployment workflow.
Developer’s Initial Steps
Commit to Code Repository
The Shopify deployment process begins with the developer’s initial steps, specifically the act of committing code to the repository. This foundational step sets the stage for a smooth and efficient deployment workflow.
Explanation of the Code Commit by the Developer and How It Helps Track Changes
When a developer commits code to the repository, they are essentially saving a snapshot of their work at a specific point in time. This action not only preserves the current state of the code but also provides a detailed record of what changes were made, who made them, and why. Each commit typically includes a message that describes the changes, which helps in tracking the evolution of the codebase over time.
This practice is crucial for several reasons:
- Version Control: It allows multiple developers to work on the same project simultaneously without overwriting each other’s work. By maintaining a history of changes, it becomes easier to identify and revert specific changes if needed.
- Accountability: With each commit being attributed to a specific developer, it fosters a sense of responsibility and accountability. This transparency helps in identifying the source of any issues that may arise.
- Collaboration: Code commits facilitate better collaboration among team members. By regularly committing code, developers can share their progress and integrate their work with that of others more efficiently.
Importance of Maintaining a Clean and Organized Codebase
A clean and organized codebase is the cornerstone of a successful deployment process. Here’s why it matters:
- Readability: Clean code is easier to read and understand, which is essential for both current and future developers working on the project. This reduces the learning curve and helps in faster onboarding of new team members.
- Maintainability: An organized codebase is easier to maintain and update. It allows developers to quickly locate and fix bugs, implement new features, and make improvements without inadvertently introducing new issues.
- Scalability: As the project grows, a well-structured codebase can scale more effectively. It supports the addition of new functionalities and modules without causing chaos or confusion.
- Efficiency: Clean code reduces the likelihood of errors and simplifies the debugging process. This efficiency translates to faster development cycles and more reliable Shopify deployments.
By committing to these best practices, developers lay a solid foundation for the subsequent stages of the deployment process. The next steps, which involve automated build and deployment triggers, rely heavily on the integrity and organization of the codebase established during this initial phase.
In the following chapters, we will explore how these initial steps integrate with automated systems to ensure a seamless transition from development to production.
Build and Deploy Process
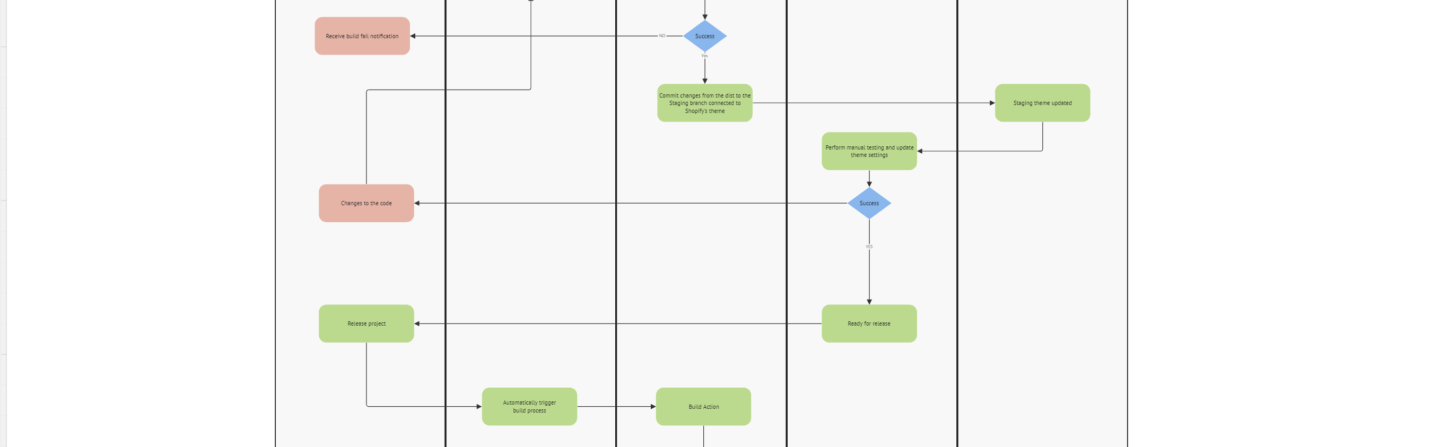
Build Action
The build and deploy process is a critical phase in our Shopify deployment workflow. This stage ensures that the code is compiled, tested, and prepared for deployment in a consistent and reliable manner.
Detailed Description of the Build Stage
The build stage is where the raw code written by developers is transformed into a deployable product. This involves several key steps:
- Code Compilation: The source code is compiled into executable code. This step may involve minifying JavaScript, compiling Sass or LESS into CSS, and other transformations necessary to optimize the code for production.
- Dependency Management: All necessary dependencies and libraries are fetched and included in the build. This ensures that the code has everything it needs to run correctly.
- Automated Testing: A suite of automated tests is run to verify that the code behaves as expected. This can include unit tests, integration tests, and end-to-end tests.
- Packaging: The compiled code and its dependencies are packaged into a format suitable for Shopify deployment. This might involve creating a zip file, a Docker image, or another deployable artifact.
Handling Build Failures and Notifications
Despite the best efforts of developers, builds can sometimes fail. When this happens, it’s crucial to have a robust system in place to handle these failures and notify the relevant parties.
- Failure Detection: The build system continuously monitors the build process and detects any failures. This could be due to compilation errors, failed tests, or issues with dependency management.
- Notification: When a build fails, an automated notification is sent to the developers responsible for the code. This notification typically includes detailed information about the failure, such as error messages and logs.
- Immediate Action: Developers can quickly review the failure details and take immediate action to resolve the issue. This might involve fixing syntax errors, addressing failed tests, or resolving dependency conflicts.
Success?
Once the build process is complete, it’s essential to determine whether the build was successful before proceeding to deployment.
Criteria for Determining Build Success
A build is considered successful if it meets the following criteria:
- No Compilation Errors: The code compiles without any errors or warnings.
- All Tests Pass: All automated tests run during the build process pass without any failures.
- No Dependency Issues: All dependencies are correctly resolved and included in the build.
- Packaging Completes Successfully: The code is packaged into a deployable artifact without any issues.
Steps Taken if the Build Fails
If the build does not meet the success criteria, the following steps are taken:
- Receive Build Fail Notification: Developers receive an automated notification detailing the build failure.
- Review Failure Details: Developers review the failure details, including error messages and logs, to understand the root cause of the issue.
- Make Necessary Changes to the Code: Developers make the necessary changes to the code to resolve the issues that caused the build to fail.
- Commit Changes to Code Repository: The updated code is committed to the code repository, triggering a new build process.
By following these steps, we ensure that only high-quality, thoroughly tested code is deployed to the staging and production environments. This rigorous build and deploy process minimizes the risk of issues in the live store and ensures a smooth and reliable deployment workflow.
In the next chapter, we will explore the staging environment and the role of quality assurance (QA) in our deployment process.
Staging Environment and Quality Assurance (QA)
Staging Environment
The staging environment is a critical step in our Shopify deployment process. It serves as a replica of the production environment, allowing us to test changes in a setting that closely mirrors the live store.
Commit Changes from the Dist to the Staging Branch Connected to Shopify’s Theme
Once the build process is successful, the next step is to commit the changes from the distribution (dist) directory to the staging branch. This branch is directly connected to Shopify’s staging theme.
- Committing Changes: The build artifacts are committed to the staging branch in the code repository. This action triggers the deployment process to the staging environment.
- Automated Deployment: The changes are automatically deployed to the staging theme on Shopify. This ensures that the latest code is reflected in the staging environment without manual intervention.
Staging Theme Updated
With the changes committed and deployed, the staging theme on Shopify is updated. This environment now mirrors the latest state of the code, providing a platform for thorough testing.
- Verification: A quick verification is performed to ensure that the staging theme has been updated correctly and that the new changes are visible.
- Environment Parity: The staging environment is configured to closely match the production environment, including settings, data, and configurations. This parity ensures that any issues found in staging are likely to exist in production as well.
Quality Assurance (QA)
Quality Assurance (QA) is a crucial phase in our deployment process. It involves rigorous testing to ensure that the code is functional, reliable, and free of defects.
Perform Manual Testing and Update Theme Settings
While automated tests catch many issues, manual testing is essential for verifying the overall user experience and catching edge cases that automated tests might miss.
- Manual Testing: QA engineers perform comprehensive manual testing on the staging environment. This includes functional testing, usability testing, and exploratory testing to identify any issues that automated tests might have missed.
- Update Theme Settings: During manual testing, QA engineers may need to update theme settings to ensure that the new changes integrate seamlessly with existing configurations. This step ensures that the theme settings are optimized for the new code.
Success?
After manual testing and theme updates, it’s crucial to determine whether the code is ready for release.
Criteria for Determining QA Success
QA is considered successful if the following criteria are met:
- No Critical Issues: No critical bugs or issues are found during manual testing.
- Functional Verification: All new features and changes work as expected.
- User Experience: The overall user experience is smooth and intuitive.
- Performance: The performance of the site is not negatively impacted by the new changes.
Steps Taken if QA Fails
If the QA process identifies any issues, the following steps are taken:
- Document Issues: QA engineers document the issues found, including detailed descriptions and steps to reproduce.
- Communicate with Developers: The documented issues are communicated to the developers responsible for the code.
- Make Necessary Changes to the Code: Developers make the necessary changes to resolve the issues identified during QA.
- Commit Changes to Code Repository: The updated code is committed to the code repository, triggering a new build and deployment process to the staging environment.
Ready for Release
If the QA process is successful and no critical issues are found, the code is considered ready for release. This marks the end of the staging and QA phase, and the code is now prepared for deployment to the production environment.
In the next chapter, we will explore the final steps of the deployment process, including the production deployment and the release of the project.
Production Deployment and Final Release
Production Deployment
The final stage of our Shopify deployment process is the production deployment. This is where the thoroughly tested and validated code is deployed to the live environment, making it accessible to all users.
Commit Changes from the Dist to the Production Branch Connected to Shopify’s Theme
Once the code has passed all QA checks and is deemed ready for release, the next step is to commit the changes from the distribution (dist) directory to the production branch. This branch is directly connected to Shopify’s production theme.
- Committing Changes: The build artifacts are committed to the production branch in the code repository. This action triggers the deployment process to the production environment.
- Automated Deployment: The changes are automatically deployed to the production theme on Shopify. This ensures that the latest code is reflected in the live environment without manual intervention.
Production Theme Updated
With the changes committed and deployed, the production theme on Shopify is updated. This environment now reflects the latest state of the code, providing a seamless experience for all users.
- Verification: A quick verification is performed to ensure that the production theme has been updated correctly and that the new changes are visible.
- Monitoring: Post-deployment monitoring is essential to ensure that the live site is functioning as expected. This includes checking for any performance issues, errors, or unexpected behavior.
Final Steps
The final steps in our deployment process ensure that the project is fully released and functioning as intended.
Release Project
The release project phase involves several key activities to ensure a smooth transition to the live environment.
- Final Checks: Conduct final checks to ensure that all changes are live and functioning as expected. This includes verifying that all features are working, the user experience is smooth, and there are no critical issues.
- Communication: Communicate the successful deployment to all relevant stakeholders, including developers, QA engineers, and business teams. This ensures that everyone is aware of the new changes and can provide support if needed.
- Documentation: Update any relevant documentation to reflect the new changes. This includes updating release notes, user guides, and internal documentation to ensure that all information is current and accurate.
- Post-Deployment Monitoring: Continue to monitor the live site for any issues that may arise post-deployment. This includes tracking performance metrics, error logs, and user feedback to quickly identify and address any problems.
Ensuring All Changes Are Live and Functioning as Expected
The final goal of the deployment process is to ensure that all changes are live and functioning as expected. This involves:
- User Acceptance Testing (UAT): Conducting user acceptance testing to ensure that the changes meet the needs and expectations of end-users.
- Performance Testing: Verifying that the performance of the site is not negatively impacted by the new changes. This includes checking load times, responsiveness, and overall site speed.
- Error Monitoring: Continuously monitoring for any errors or issues that may arise post-deployment. This includes tracking error logs, user reports, and automated alerts to quickly identify and address any problems.
Conclusion
In this chapter, we explored the final steps of our Shopify deployment process, including the production deployment and the release of the project. By following a structured and rigorous process, we ensure that every update, feature, and fix is deployed smoothly and efficiently, minimizing downtime and maximizing customer satisfaction.
In conclusion, our deployment process is designed to maintain a robust, efficient, and reliable workflow from development to production. By adhering to best practices and leveraging automation, we ensure that our Shopify stores remain up-to-date, functional, and optimized for the best possible user experience.
Thank you for joining us on this journey through the Shopify deployment process. We hope this guide provides valuable insights and practical steps to enhance your own deployment workflows. Stay tuned for more expert tips and best practices in future posts.